Running Selenium tests with Jenkins Pipelines and Zalenium
In the very first post, I would like to tackle a quite common challenge that QA engineers face: setting up a CI job that runs Selenium tests, without any infrastructure in place.
Being either a test automation engineer or a more generally oriented QA/tester is becoming more challenging in the dynamic software development environment we live nowadays. Processes such as Continuous Delivery require fast and reliable test infrastructure and CI jobs that can be scaled and maintained easily. Failure in this part means blocking the whole development as it relies on test automation heavily. It falls on aforementioned roles to provide such setup or at least maintain it and be aware of what is happening behind the scenes. Thus, neglecting such knowledge may hinder your capability to be efficient in the nearest future.
Key takeaways:
- You will set up a local Jenkins instance
- You will know the basics of Jenkins Pipelines
- You will know how to set up Zalenium, a Selenium Grid wrapper
- At the end, you will reuse all the above blocks to create a CI job that triggers Selenium tests on a Grid
Some background information
Jenkins
Jenkins is one of the most popular tools when it comes to setting up a Continuous Integration system - it is free and highly extensible via available plugins. Unfortunately, it had some serious downsides when working on a large scale in a dynamic environment.
Have you ever been bored nearly to death with setting up multiple Jenkins jobs, with complex relationships, in yet another project?
And then having to replicate that setup across numerous environments, ending up as one of the few people (or, oh the horror, the only one) on the team who actually knows what is happening when?
Have you thought sometimes how some plugin quirks would be easily overcome by simply coding that problematic part around?
I have been dealing with above problems for years so I was for once really excited to tackle it again in my latest project because, fortunately, the above is not the case with Jenkins anymore - Pipelines come to the rescue!
What are Jenkins Pipelines?
A somewhat simplified answer would be: it’s a Groovy script using a dedicated domain-specific language exposed by Pipeline-compatible plugins and Jenkins itself, that describes a given CI/CD workflow. It allows defining the delivery pipelines as a code. It is a concept that fits into modern DevOps practices, where things like the whole infrastructure setup and configuration can be defined in form of a piece of code, with all the regular benefits that come with any development: version control, opportunity to review incoming changes within the team etc. A pipeline is kept in a Jenkinsfile, a naming convention Jenkins follows after Gemfiles, Dockerfiles etc.
Moving to a scripted definition isn’t the only advantage of Pipelines. The scripts are run in a continuation passing style (more info) and thanks to that they are pausable and can even survive a Jenkins restart.
More information can be found in the official Jenkins docs: link, here.
While the name may suggest that they are dedicated only to describing whole pipelines, they also can be used for smaller jobs executing more tactical tasks that we would like to have available to be run on demand, that are not even necessarily part of the whole CI/CD flow. We will create such type of job first, to get a better understanding of the actual tool instead of focusing too much on the process.
It is worth mentioning here that Pipeline is still quite a fresh implementation - when I was starting to work with Pipelines I encountered numerous issues, sometimes already documented in Jenkins’ JIRA, other times requiring from me to dig through different docs, plugins source code etc. to try to understand what was happening with my supposedly correct script. What is really reassuring though is that most of the issues I have encountered were fixed a few versions later - the feature is used exhaustively by many users that test it thoroughly. And to be honest, in case of such complex tool, such user tests are really the only meaningful way to validate it - there are so many different use cases, coupled with various plugins available to Jenkins that it is really hard to predict all possibilities. Also, bear in mind, that not all plugins can be 100% compatible with Pipelines - fortunately, they quickly catch up to the idea of them being used as part of a script and start to provide their own DSL. Just remember that some plugins you were used to using are not actively developed (which brings a myriad of other problems) so sometimes it might require finding some other solution, scripting that plugin part by yourself or maybe create a new plugin or commit a fix to the existing one. It is very easy to take from open source community but have you ever considered giving a bit back :)?
Selenium Grid
When it comes to Selenium Grid, the basic setup is quite straightforward: you download the necessary JARs, start the hub and some nodes and have an infrastructure eager to receive these ultra-stable tests you have written.
Then some of the nodes start failing.
Then the next version of Selenium or browser-specific driver comes out and you need to update all that stuff.
Then you need to scale the grid - you do it quite easily… but now when another update is released you have more nodes to upgrade.
Not mentioning that the setup is not so movable across different machines.
Unless you provision it automatically… or use a tool like Zalenium.
What’s Zalenium?
It’s an open-source tool created by engineers from Zalando. It was presented on 2017 Selenium Conference in Austin (a really nice presentation, by the way, I encourage you to check it out). In few short words, it’s a Selenium Grid on steroids - easy to setup, disposable and automatically scalable. You can read up more about all its capabilities in their documentation.
It is a Docker-based solution so OS-related problems are handled by containerization. You pull required browser images, the Zalenium image, spin up its container specifying the number of initial nodes and the grid is ready to receive your tests. After running one of them on a specific browser, the respective container is discarded and before next test runs, new containers with requested browsers are spun up by Zalenium. If you are using a browser/device cloud such as Sauce Labs or Browserstack then in case of not having nodes capable of handling incoming tests Zalenium can reroute them to these providers.
I always think that learning through practice is the best way to memorize and understand new things and it is a pattern that I will try to repeat in my posts describing more practical stuff.
Enough of lengthy introductions then, let’s move to the actual content ;).
Setup
First, a list of things that will be needed:
- A Git repository hosted on Github/Bitbucket/any other hosting.
- A Jenkins instance
- A Zalenium instance
- And, of course, some tests to run
As the first step is the simplest one, pick a hosting, create a repository, clone it and on to next one!
Jenkins
Fortunately for us, multiple installers for any OS are provided at their site. Personally, I prefer the Docker version as it does not ‘pollute’ my system with things that I would discard anyway (you do not want to run the CI system from your PC, right?). For that purpose, you would first need to set up the Docker itself, which also provides multiple download options. And since we will need it for Zalenium anyway… it is a win-win.
Now, do not be afraid if you consider this installation already too complicated, be assured - it is not. Additionally, you can utilize Docker to mitigate different problems - it provides you with an abstraction layer that makes OS-specific issues non-existent and it is an excellent tool for quick PoCs that can be discarded afterward. And as I have already mentioned at the beginning, skills related to infrastructure setup will become more and more important in tester/QA role, it won’t hurt to have additional toys ready in your arsenal.
Also, learning new things is always exciting, right ;)?
During Jenkins setup (the whole process is guided by a friendly wizard), if you selected the recommended plugins installation during the process, you are almost good to go. If not, make sure that Pipeline and Pipeline: Stage View are installed in <jenkins-address>/pluginManager. Also, install the Blue Ocean plugin - it is the ‘new’ modern UI for Jenkins that apart from nice looks gives superb pipeline visualizations.
Having Jenkins up and running, we can start creating our pipelines. But first, we need to make some decisions about how are the pipelines going to be developed.
There are two ways available to write pipelines: declarative or scripted. The difference between them is that declarative approach is dedicated for less technically oriented folks and provides a more strict DSL (it still allows raw Groovy scripts via script step though). The scripted approach to pipelines is a more advanced way to write your pipelines and requires handling more things manually.
The scripts presented in my posts will use the latter one mostly due to couple reasons, like the fact that the declarative version was not available when I have started working with Pipelines and got used to it ;) and because in my opinion it is the approach that provides a better learning experience showing in more detail what is actually happening in Pipelines flow.
The next decision is in which repository are we going to store our scripts. As the whole pipeline is described as a code, we may naturally be inclined to storing it together with the application that we are developing. This unlocks additional possibilities, as Jenkins supports multi-branch pipelines - it automatically generates jobs from the Jenkinsfile for each branch in the provided repository, giving this way a powerful tool for assuring quality on a more granular level. But for now, for simplicity reason, we will be storing our scripts in a dedicated, separate repository.
Designing a regular job
Note: by a ‘regular job’ I mean a single task automated in Jenkins, not a whole implemented process. The way we define jobs differs from what you may know if you have been setting them up in a classic way in Jenkins. There we would pick the type of the job, e.g. Maven project, specify repository, add Maven phases, goals and parameters, add some pre-steps or post-steps etc. This changes a bit in case of Pipelines - we still need to provide all that information but more explicitly.
Pipelines are defined as steps which are executed in stages. What kind of stages and steps can we define in case of running Selenium tests?
The structure will be quite simple:
- Stage: Checkout
- Check out the Git repository
- Stage: Run tests
- Run the tests
- Process the report
- Archive the results
Implementing the job
Knowing what we are trying to achieve, let’s forge the idea into a concrete working implementation.
In the repository, let’s create a new folder dedicated to this post and put an empty Jenkinsfile inside it. Open it in your favorite editor and let’s create the skeleton of our job/pipeline:
#!groovy

node('master') {
    stage('Checkout') {
        echo 'Code checkout'
    }

    stage('Run tests') {
        echo 'Running tests'
    }
}
It does not look scary, right? A brief explanation of what we have so far:
- Node is an allocated Jenkins worker - any material, resource-heavy work should be done in a node (pipelines scripts utilize a lightweight worker on Jenkins Master)
- Stage defines logical parts within our job
- ‘echo’ step prints provided string to the console output
For some general tips regarding pipelines see this article.
After committing the file and pushing it to the repository the Jenkinsfile is ready to be used on our Jenkins instance.
Navigate to your Jenkins instance in the browser and create a new job. Select ‘Pipeline’ type and enter a name for it.

Next, in the job’s configuration in the Pipeline section select ‘Pipeline script from SCM’ in the ‘Definition’ dropdown and provide your repository details and the path to the Jenkinsfile. Since a regular CI job runs very often, it is worth keeping the lightweight checkout on.

Save the configuration and open it in Blue Ocean view. Since it’s fresh, the job will prompt you to run it and this is what we are going to do.
It should be quick and successful, the pipeline at this point is doing almost nothing. Open the first run and this is the view you should see:
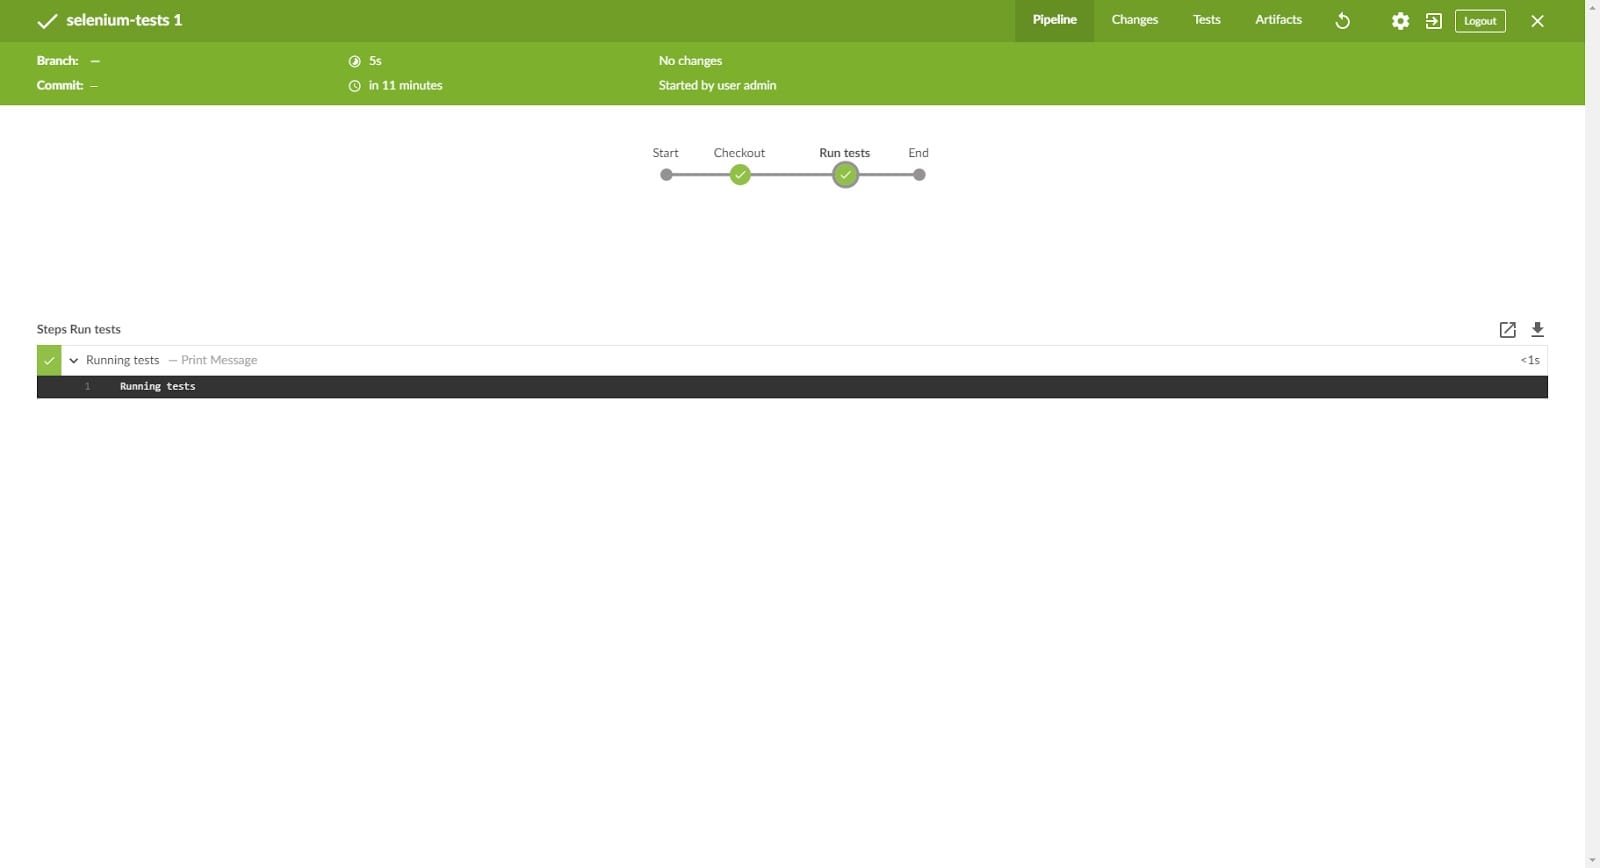
It does not look that impressive in comparison to Stage View in classic UI… yet. Trust me, it is going to become really handy in more complex pipelines where you execute different steps in parallel etc.
Tests
It is fun to look how our dummy job always passes but it is high time to get some real tests running. In this post, I am going to use the Bobcat framework to generate some sample Selenium tests right away. It is a Selenium framework written in Java we developed at Cognifide. It allows neat Page Object handling, go check it out :). It has couple Maven archetypes available, so to generate sample tests go to your repository where the Jenkinsfile is stored and type this in a console:
mvn archetype:generate -DarchetypeGroupId=com.cognifide.qa.bb -Dfilter=bobcat
then provide required information (pick the latest version and Bobcat JUnit archetype). After everything is confirmed, you will have a sample Maven project with tests in Bobcat.
To execute the tests locally, run the following (I’m using Chrome, in this case, so a ChromeDriver executable is required and I need to point Selenium to it):
mvn clean test -Dwebdriver.type=chrome -Dwebdriver.chrome.driver=E:/Workspace/chromedriver.exe
Alright, let’s add the project to our source control so it can be triggered from Jenkins.
In the next step, we need to update the pipeline. The echo steps need to be replaced by the proper commands: checkout and sh respectively. The former, as the name suggests, handles source code management while the latter executes the provided shell command. Additional note on the checkout step: it is a generic SCM operation. Usually when working with multiple Git repositories it would be easier to use the git step but in this case, since we store the Jenkinsfile in the same repository as our tests codebase and we configured URL and credentials in the pipeline itself, we can utilise the scm environment variable that stores that information.
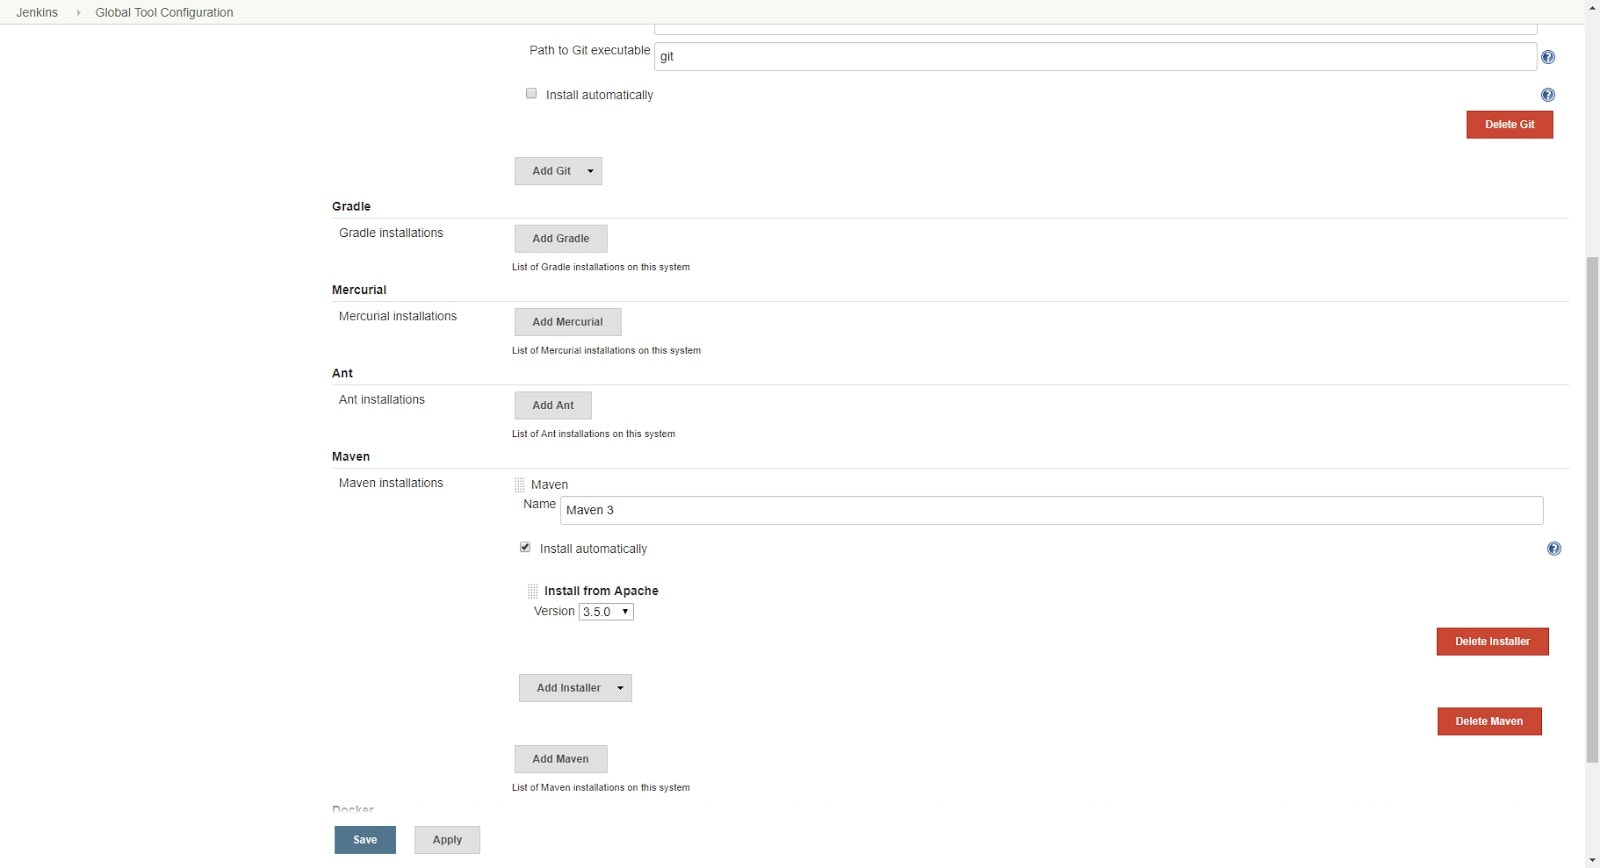
Since we will be using Maven, we need it configured on Jenkins level. Go to ‘Manage Jenkins’ -> ‘Global Tool Configuration’ and add a Maven installation. Jenkins will download that version automatically to the executor on which Maven tool is requested. While it is totally possible to continue with our pipeline update, there is a plugin that simplifies Maven handling: Pipeline Maven Integration plugin. It provides an additional wrapping step, that allows us to trigger Maven builds in a more concise way. Install it and let’s continue.
Our final pipeline script looks as follows:
#!groovy

node('master') {
    stage('Checkout') {
        checkout scm
    }

    stage('Run tests') {
      withMaven(maven: 'Maven 3') {
          dir('bobcat') {
            sh 'mvn clean test -Dwebdriver.type=chrome -Dwebdriver.chrome.driver=E:/Workspace/chromedriver.exe'
          }
      }
    }
}
Commit, push and run the job.
Oops, it failed.
The reason for that is naturally the missing ChromeDriver executable on the Jenkins master. Since we want to have an auto-scalable Selenium Grid, we can finally move to the last missing part of our puzzle: Zalenium.
Zalenium
Zalenium is a Docker-based solution. We have the initial setup already covered and next steps are also straightforward, as it is described in their Getting started section in the README.
We simply need to run couple commands to have Zalenium ready to handle our tests:
- Pull Selenium images:
docker pull elgalu/selenium - Pull Zalenium image:
docker pull dosel/zalenium - Start a brand new Zalenium container:
  docker run --rm -ti --name zalenium -p 4444:4444 \
    -v /var/run/docker.sock:/var/run/docker.sock \
    -v /tmp/videos:/home/seluser/videos \
    --privileged dosel/zalenium start
And that’s it! You can navigate to http://localhost:4444/grid/console (or other IP of your Docker host) to see the grid available.
Now, what is beautiful is that you can kill that container and spin a new one the same easy way - you can even create a small Jenkins job that will do that for you!
Having the infrastructure in place, we can point our tests to use the Grid instead of a local ChromeDriver. Our updated pipeline should look like this:
#!groovy

node('master') {
    stage('Checkout') {
        checkout scm
    }

    stage('Run tests') {
      withMaven(maven: 'Maven 3') {
          dir('bobcat') {
            sh 'mvn clean test -Dwebdriver.type=remote -Dwebdriver.url=http://localhost:4444/wd/hub -Dwebdriver.cap.browserName=chrome'
          }
      }
    }
}
Now our job should run without any problems and get back to that successful state everyone is always hoping for… ;).
One last thing: we need to take care of results and reports archiving. Let’s throw in the following:
#!groovy

node('master') {
    stage('Checkout') {
        checkout scm
    }

    stage('Run tests') {
        try {
            withMaven(maven: 'Maven 3') {
                dir('bobcat') {
                    sh 'mvn clean test -Dwebdriver.type=remote -Dwebdriver.url=http://localhost:4444/wd/hub -Dwebdriver.cap.browserName=chrome -Dmaven.test.failure.ignore=true'
                }
            }
        } finally {
            junit testResults: 'bobcat/target/*.xml', allowEmptyResults: true
            archiveArtifacts 'bobcat/target/**'
        }
    }
}
Couple words of explanation:
- The
maven.test.failure.ignore=trueis set to avoid setting non-zero exit codes when there are test failures, since… - …
junitstep handles the results analysis - At the very end, we are archiving contents of
targetfolder - Since we want always to handle the results, we wrapped the necessary steps in a
try-finallyblock
And that’s it for the complete solution.
Summary
Alright, the post ended up a bit longer than I anticipated!
To sum up what we achieved:
- we have set up a standalone Jenkins instance
- we have set up an instance of Zalenium
- we have created a working element of a real CI/CD flow that runs Selenium tests using the above combo
Hopefully, you see how Docker and available solutions around it can speed up the-usually-not-so-funny setup of different things You know the basics of Jenkins Pipelines - knowledge that will be especially helpful in next posts where I will present more complex Continuous Delivery pipelines.
Try to play with the results on your own, perhaps experiment with some other plugins you find, modify the pipeline a bit.
The whole example is available in this Github repository.
I appreciate any feedback, comments and suggestions - feel free to use the Contact page.
4 Comments
Ishan
Very well explained Micheal. Keep writing :)
AutomatingGuy
Thanks :)!
Artur
It’s always good to keep up with such a valuable content !
AutomatingGuy
I’m glad you liked it :)!